This is one of the features I've found useful many times over the years, so is one of the first tips that I'll introduce and will be the first macro that I'll cover on this blog. To learn more about macros, click here.
THE NEED:
Do you ever have the same data to enter over and over and over and over again? For instance, for a weather description column for Las Cruces (NM) in June: Sunny, Sunny, Sunny, Sunny….
Or, how about multiple columns or a whole row of data that needs to be repeated for tens or hundreds of rows? It's often useful and necessary that each datum (i.e. species and number detected) have all ancillary data associated with it (i.e. habitat type, plot #, date, soil type, etc). This data format is necessary in order to use Pivot Tables, to export into SAS or other statistical software, etc.
MACRO USE:
If you need to do a lot of this activity, you may want to use a macro. With this Excel macro, you can highlight the data you want to repeat, press a 3-key combination, and data is automatically filled in until it gets to a non-empty cell (and it won't replace data in that cell).
We'll use the same example as above, which comes from the "Test Page" tab in the file "Colin's Macro Library.xls" that you can download for free here. After you download the worksheet, which already has the macro in it, you can go to the "Test Page" tab and try-out the instructions below. There are actually two macros covered here and in the macro library that do slighly different things:
Copy, Fill-Down, & Stop at Next Unique Value: "Ctrl+Shift+F" Macro
This macro copies a piece of data (or multiple columns of data) and pastes that data in blank cells until it gets to a non-empty cell and stops in that cell. The benefit of the first macro over the "Go To Special" method is that you can review each piece of data before it's copied and pasted, but it still accomplishes the task quickly.
Copy, Fill-Down, & Continue Until an Asterisk: "Ctrl+Shift+G" Macro
The second macro does the same but continues copying unique data values in a column until it finds a "*" (asterisk). With either of these macros, you'll have to put a "stopper" at the end of the dataset (see below).
I'll describe both macros here:
First I'll copy the Unit and Habitat data ("A" and "Wetland") to other rows until the end of the dataset. I'll also want to copy and fill-down the plot and time, but those rows of data don't go as far down as the Unit and Habitat data, so we'll do those separately.
A note of caution here is that macros cannot be undone! So, save your worksheet before you apply the macro in case the results aren't what you expected.
MACRO DETAILS:
For those interested, here is my macro code that accomplishes the first macro. The second macro text (Ctrl+Shift+G) is there as well, but you would have to erase the apostrophe (') before the lines of code that start with "Do", "Loop", and the last "Selection.End". (The single apostrope at the beginning of the line tells the macro to ignore anything after that as a comment that it shouldn't read.)
Sub Fill_Down()
'
' Fill_Down Macro
' Macro recorded 5/2/2007 by Colin Lee
'
' Keyboard Shortcut: Ctrl+Shift+F
'
' Do Until ActiveCell.Value = "*"
Selection.Copy
Selection.End(xlDown).Select
ActiveCell.Offset(-1, 0).Range("A1").Select
Range(Selection, Selection.End(xlUp)).Select
ActiveSheet.Paste
Selection.End(xlDown).Select
' Loop
' Selection.End(xlUp).Offset(1, 1).Select
End Sub
THE NEED:
Do you ever have the same data to enter over and over and over and over again? For instance, for a weather description column for Las Cruces (NM) in June: Sunny, Sunny, Sunny, Sunny….
Or, how about multiple columns or a whole row of data that needs to be repeated for tens or hundreds of rows? It's often useful and necessary that each datum (i.e. species and number detected) have all ancillary data associated with it (i.e. habitat type, plot #, date, soil type, etc). This data format is necessary in order to use Pivot Tables, to export into SAS or other statistical software, etc.

This entry explains how to easily copy data and fill blank cells below it in columns. I'll explain a way to do it without and with a macro.
USING THE “Go To Special” FEATURE TO FILL BLANKS:
Follow these simple instructions:
- Highlight the columns that contain spaces that you wish to fill (A through C in the example).
- On Excel 2007/2010, on the "Home" tab, and "Editing" portion of the ribbon, click on "Find & Select". (In excel 2003, use "Edit" and "GoTo")
- Click on "Go To Special".
- Click the bubble next to "Blanks".
- Type "=A2" or whatever cell is just above the first blank space.
- Hit Ctrl+Enter.
At this point, if there was an error with this operation, you can hit the DEL key to clear the entries. If you want to accept these changes, you'll then have to highlight the columns that you just created these formulas in and do a paste special of values to get rid of the formulas:
- Highlight your original selection, click Ctrl+C to copy (or select the copy button).
- Click on the arrow below the “Paste” button.
- Click on "Paste Special".
- Select the bubble next to “Values” and hit the Enter key.
(Shortcut keys for this are: "Alt", "e", "s", and "v")
If you need to do a lot of this activity, you may want to use a macro. With this Excel macro, you can highlight the data you want to repeat, press a 3-key combination, and data is automatically filled in until it gets to a non-empty cell (and it won't replace data in that cell).
We'll use the same example as above, which comes from the "Test Page" tab in the file "Colin's Macro Library.xls" that you can download for free here. After you download the worksheet, which already has the macro in it, you can go to the "Test Page" tab and try-out the instructions below. There are actually two macros covered here and in the macro library that do slighly different things:
Copy, Fill-Down, & Stop at Next Unique Value: "Ctrl+Shift+F" Macro
This macro copies a piece of data (or multiple columns of data) and pastes that data in blank cells until it gets to a non-empty cell and stops in that cell. The benefit of the first macro over the "Go To Special" method is that you can review each piece of data before it's copied and pasted, but it still accomplishes the task quickly.
Copy, Fill-Down, & Continue Until an Asterisk: "Ctrl+Shift+G" Macro
The second macro does the same but continues copying unique data values in a column until it finds a "*" (asterisk). With either of these macros, you'll have to put a "stopper" at the end of the dataset (see below).
I'll describe both macros here:
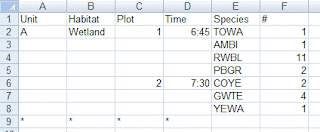
First I'll copy the Unit and Habitat data ("A" and "Wetland") to other rows until the end of the dataset. I'll also want to copy and fill-down the plot and time, but those rows of data don't go as far down as the Unit and Habitat data, so we'll do those separately.
- Be sure macros are enabled by selecting "Enable Content" when you first open the Excel worksheet file. The worksheet has to be open to use the macro, but you can use the macro in any other worksheet that is concurrently open on your computer. See my "About Excel Macro" page for more information about this.
- Use "stoppers" at the end of the dataset (in row 9) to signal where to stop the fill-down process. In the example above, I use "*"s but as far as the first macro is concerned, you can use any other character (second macro must have "*" unless you change the code). If you enter data as I did in columns C and D where the "2" and "7:30" are filled in wher the plot and time change, then these data points will be used as stoppers in those columns for the first macro.
- To copy and fill-down the Unit "A" and Habitat "Wetland" data, highlight A4 through A5, and press Ctrl+Shift+F. The data should automatically be filled in down to row 9 and stop with the cursor on the "*" in column A.
- Try doing the same for the individual data points"1" and "2" by placing your cursor on the "1" under the column "Plot #" and pressing Ctrl+Shift+F twice in a row. It should copy and fill-down both the 1 and the 2. You can press the shortcut key for the first macro repeatedly to work down a worksheet because after filling data down a column, the cursor stops at the next non-empty data cell in that column and is ready to copy and fill-down again.
- For the second Macro, place your cursor on the "6:45" and press Ctrl+Shift+G. You'll see that the 6:45 and 7:30 are copied until the "*" and the cursor is placed at the top of the next column, ready for the next copy and fill procedure.
A note of caution here is that macros cannot be undone! So, save your worksheet before you apply the macro in case the results aren't what you expected.
MACRO DETAILS:
For those interested, here is my macro code that accomplishes the first macro. The second macro text (Ctrl+Shift+G) is there as well, but you would have to erase the apostrophe (') before the lines of code that start with "Do", "Loop", and the last "Selection.End". (The single apostrope at the beginning of the line tells the macro to ignore anything after that as a comment that it shouldn't read.)
Sub Fill_Down()
'
' Fill_Down Macro
' Macro recorded 5/2/2007 by Colin Lee
'
' Keyboard Shortcut: Ctrl+Shift+F
'
' Do Until ActiveCell.Value = "*"
Selection.Copy
Selection.End(xlDown).Select
ActiveCell.Offset(-1, 0).Range("A1").Select
Range(Selection, Selection.End(xlUp)).Select
ActiveSheet.Paste
Selection.End(xlDown).Select
' Loop
' Selection.End(xlUp).Offset(1, 1).Select
End Sub
No comments:
Post a Comment